January - February - March - April - May - June - July - August - September - October - November - December - Odds and Ends


March

Time to mulch the daylilies.


Mulch is good no matter what climate you live in but it is especially important here along the gulf coast because of our hot summers. It helps hold in moisture and also insulates the ground from the hot Texas sun.

I have tried several types of mulch with mixed results.

  • Fresh coarse wood chip mulch - this was a huge mistake. It was basically coarsly chopped tree branches. It was ugly and used up much of the nitrogen from the soil as it tried to break down.
  • Horse stable sweepings - originally this was great! I would haul it myself from a small stable. It was well composted and fertilized the soil as well as mulched it. Unfortunately, that stable closed.
  • Horse manure (actually stable sweepings) from a local soil yard - This was all I could find for a long time. I contained a high percentage of wood chips and was not composted very much. Sometimes it was so fresh you could smell it from quite a distance away if you were downwind. It contained a large amount of weed seeds and I'm still battling some of these weeds today.
  • Aged, composted hardwood mulch - what I'm using now. This has worked very well as it contains no weed seeds and seems to last fairly well. Because it's made from hardwood (screened so no large chunks) it breaks down fairly slowly and feeds the soil.

I purchase the composted hardwood mulch by the yard and spread it about 3" thick around all the plants. The one downside to any mulch is that as it breaks down over time, it raises the soil level around the plants. Eventually, the daylily crowns will be too deep in the soil. When this happens, the daylily may start forming a new crown higher up. During this process which takes about a year, the daylily may not bloom at all. Digging and dividing every few years usually keeps this from happening.


Fertilizing the seedling beds (the ones that will bloom for the first time this season).


The seedling beds containing my new seedlings only get fertilized once during the two year growing cycle. This fertilization is done about a year after planting in March as the ground begins warming. I use a water soluble fertilizer with a low middle number applied with a hose-on sprayer. Even though many of the plants usually don't look like they need it, I believe they may need a little 'snack' to help get them ready to bloom because the plants are packed so tightly in the bed.

I would much prefer to use something organic or compost to feed the seedlings but they are growing 4" apart in rows 8" apart and are growing through weed block so that just isn't practical. I previously tried fertilizing using Milorganite which is non-burning and should be safe enough to be placed in close proximity to the plants. It was a very labor intensive and back breaking chore. So I 'bit the bullet' and now go with the water soluble fertilizer because it's easy to apply.


Preparing the seedling bed for the new transplants


Now that last year's seedling discards have been removed, the bed needs to be prepared for the new transplants. Because the bed will remain untouched for a couple of years, I always add organic matter and have it tilled in before transplanting the new seedlings.

I used to use just horse stable sweepings but when they became mostly wood chips, I noticed the seedlings took longer to start growing and didn't do as well the first summer. I am now using leaf mold compost and it seems to be making a positive difference. I cover the entire bed about 2" deep before tilling.

I also spread a variety of additives depending on what's available. Just about anything that increases the organic matter in the soil is good. One year I got a deal on some expanded shale and added that with good results. Expanded shale can absorb about 20% of its weight in water while also improving drainage and air circulation in the soil. I also like to spread a bag of MicroLife organic fertilizer over bed. MicroLife is an all organic fertilizer plus a Bio-Inoculant (beneficial micro-organisms) which gives the soil a boost with no worry about burning the new transplants.

Finally, I spread a light dusting of vermiculite over the entire bed. It's probably not enough to do much for the soil but it helps me know how well the yard guy tills everything into the soil. I have my yard guy till it up because a few years ago found out that I could get it done for not much more than it cost me to rent a tiller and it's MUCH easier than doing it myself (smile)!


Preparing the seedling bed for the new transplants - more

After tilling the bed and removing any remaining roots, the bed is raked smooth. It usually doesn't take the neighborhood cats long to discover this mega cat box so I have to act fast to get the bed ready for the new transplants. The first picture to the right is the bed after tilling.

Because I have bad knees I am always trying to find ways to minimize the amount of weeding I have to do. Weeding new seedlings was one of the most time consuming tasks so fortunately I have come up with a system that really keeps this weeding to a minimum. First I smooth out the bed so I have a level surface.


Then I cover the bed with commercial grade weed block except for the pathways which I cover with roofing shingles. The weed block is secured either by stapling it to the border or with pins which come with the fabric. I know I won't get any 'garden of the week' awards with paths made from roofing shingles but I am a working hobby garden, not a display garden and the shingles make great weed-proof paths.
The bed, tilled and smoothed out

The bed with the weed block and paths


Transplanting the new seedlings


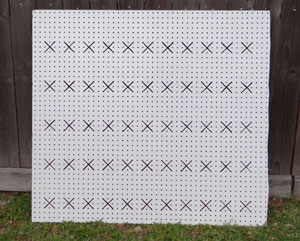
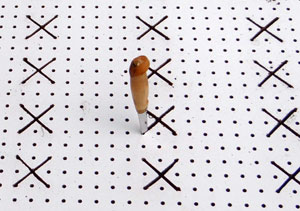
Next I needed to cut and 'X' for each seedling transplant into the weed block fabric. With a bed capacity of 900+ seedlings, that's a lot of 'X'es to cut. To facilitate this I made a template out of a 4'x4' 1 inch pegboard that I purchased at the home improvement store.

Using the holes as a guide, I cut 2" 'X'es in the pegboard. They are spaced 4" apart in rows and the rows are 8" apart. I realize this puts the seedlings quite close together but I have limited space and this works for me. It took me a while to make the template but I have been using it for years.

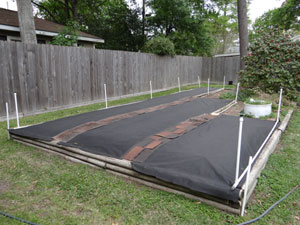
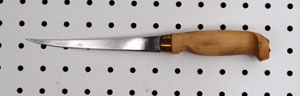
In the picture to the right I use an inexpensive fillet knife to make the 'X'es in the weed block fabric using the template as a guide. More recently, I have found that a box cutter works just as well and the blades can be replaced inexpensively when they become dull. That's a big help because I was never very good at sharpening the fillet knife.

Regardless of what's used to cut the X's, it's important to keep the knife sharp so that the cuts are quick and easy and don't tear the fabric.

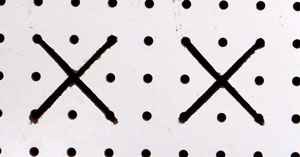
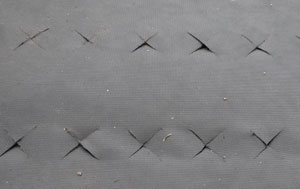
The result is nice clean cut and evenly spaced 'X'es.

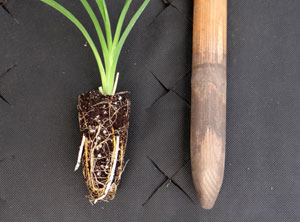
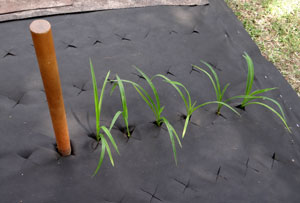
The seedlings have formed a nice root mass shaped like the cell of the trays they are growing in. To make transplanting a snap I made myself a 'dibble' using a 2 foot piece of round wood typically used in making handrails. I shaped one end to a blunt point and it looks remarkably similar in shape to the root ball of the seedlings.

I use the dibble to make a hole at each 'X' and drop a seedling into the hole.

I then put old markers to separate the different crosses in a row and I make a map of the entire seedling bed so I know what crosses are planted where.

4' X 4' template

Template closeup

Fillet knife

Using the template to cut X's

Resulting weedblock cuts

Seedling and dibble

Using the dibble to plant