|
Time to look at the evaluation beds
Once the pollination process is through, I make the rounds of the evaluation seedlings writing down their statistics. This includes scape height, number of branches, number of buds, and any notes I want to remember about a seedling. I make notes on blooms sizes as the season has progressed but I wait until after peak bloom to capture the other data as it's easier to do bud counts after they have bloomed.
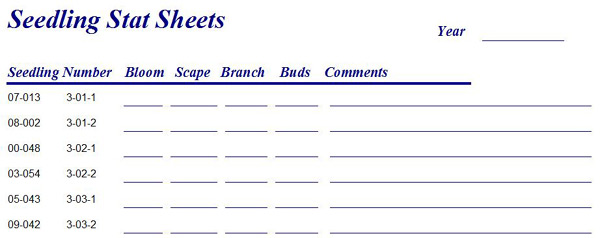
I generate a blank form (image right) from my Access database at the beginning of the season and fill it in as I go along. The form lists all the seedlings I'm tracking in order by their garden location. This makes the sheet easy to work with.
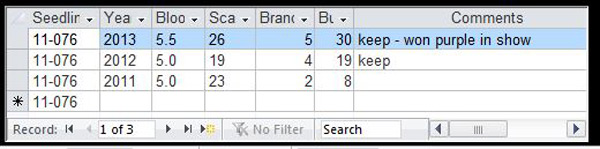
Once I have written down all the info on the sheet, I enter it in my database. This is done using a form (image right) which allows me to enter the statistics for each year for each cultivar. This form is embedded in my seedling form so I can add the stats for multiple years.
|
Statistics gathering form
Statistics entered in database
|
|
|
Bloom substance, or more importantly the lack thereof
Bloom substance plays a part in selecting seedlings. The more substance a bloom has the better it holds up throughout the day in the garden. Blooms with good substance will usually still look good in the late afternoon whereas poor substance blooms may already be done for the day. Also, the more substance a bloom has the more rain it can withstand and still look ok. So I try and note those new seedlings that lack substance as it will be an important factor when I select which ones will be evaluated further.
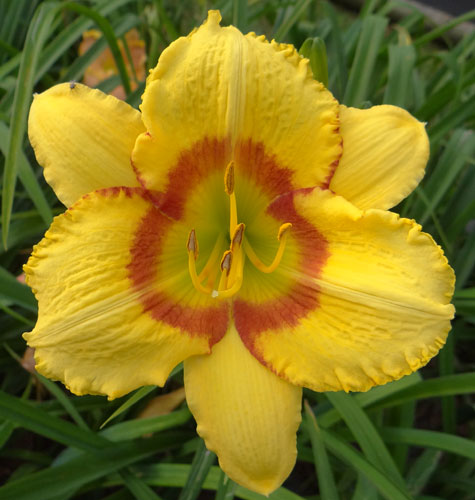
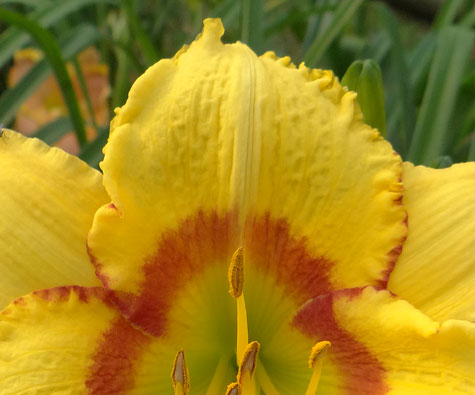
The seedling below caught my eye immediately when it bloomed. The bright yellow color with the orange eye made the bloom stand out from a distance. Unfortunately, the substance was very poor. The petals are so thin they are almost a little translucent. If you look carefully at the image on the right you can make out the sepals behind the petal.
The bloom looked ok in the morning but by 6:00 pm it looked like yesterday's bloom. It was completely wilted and hung like a blob of crumpled tissue paper. Definitely NOT on my 'keeper' list (smile).
|
|
Review the new season's marked seedlings
There are roughly three years of seedlings in the evaluation beds and each fall I remove roughly one third of them. Then I have to decide which of the new seedlings will take their place in the evaluation beds.
Now that bloom season is tapering off, I have time to evaluate the results from the newly flagged seedling crop. Using the stats I've gathered along with the pictures, I rate each of the new seedlings into one of three groups as follows.
- Group 1 - definite keepers
- Group 2 - keep if there's room
- Group 3 - the rest
Like my review of the evals, I like to do this as soon as possible as the seedlings' performance is fresh in my mind.
One thing that I have noticed from these reviews is that I often see a bigger picture of how I may have failed in reaching one or more of my goals. For example, I like large blooms and one of my goals is to produce seedlings with large blooms. One year the results showed I was making too many crosses with smaller daylilies resulting in a low percentage of seedlings with large blooms. That helped me focus on making crosses with larger parents the following year.
|
|
The seed harvest is beginning
The seed harvest usually starts around the last half of June. Every day I walk the garden looking for pods that have ripened. A pod that is ready to harvest will start to split open, usually at the top. If I wait too long the pod can split wide open spilling the seeds on the ground (what a waste)!
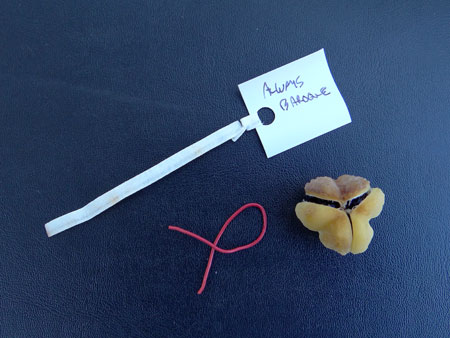
As I pick each pod, I put it in a plastic baggie along with the colored wire that was wrapped around its base. Pods of different colored wires go in separate bags. Then I write the name of the pod parent on a small tag and put it in the baggie with the pod and wire.
After all the pods of the day have been gathered I sit in air conditioned comfort and remove the seeds from the pods. The seeds go back in the baggie with the wire and the baggie is twisted closed using the tag. The baggies then go into the crisper drawer of the fridge to 'chill' until it's time to plant. I don't air dry the seeds unless it has rained the day of harvest. I like my seeds 'fresh' and they will only be in the fridge for a few weeks before planting.
I have several hundred of the old-timey 'fold lock' baggies which I reuse year after year. They take up less room in the fridge and I think they are easier to work with the the bulkier zip-lock style bags.
|
|
The tag tells me the pod parent and the color wire can be looked up in my spreadsheet to see what the pollen parent was so I have all the information about each cross. The nice part about this process is the relatively small number of tags I have to write. I used to write a tag for each bloom I pollinated. That resulted in a lot of tags for crosses that didn't take which was a huge waste of time during my critically short pollination time.
I make my own tags. Some years ago I obtained several boxes of twist ties that I use to make the handle of the tag. I use some old 1" plastic window blinds for the tag itself. I cut them into 1.5" pieces and punch a hole in one end with a paper punch. Then I thread one end of the twist tie through the hole and twist it to hold it in place to make the handle.
It takes a couple of hours to make enough tags for a season but it's a good 'mindless project' to do while watching tv (smile).
|
|
|