 |
 The Happy Daylily Blog - daylily pictures and thoughts from my garden
|
| May 11th, 2017 |
I sometimes get questions about the pictures I post in this blog. Questions vary from what kind of camera I use to what camera settings are best and usually end up with what recommendations do I have for taking good daylily pictures.
I use a Sony DSC-HX200V camera which I've had for a number of years. As for settings, that's easy. The DSC-HX200V is a 'point-n-shoot' type camera so I just set it on 'intelligent automatic' mode and click away.
As for recommendations, I don't like shooting in full, bright sun and I try to take my pictures early in the day. On sunny days shooting while the bloom is still in the shade right before the sun reaches it is probably best while light overcast also works well. Shooting too early can produce washed out colors if the beds are still in the shade.
Other than that, my only recommendation is to have persistance. I take lots of pictures. Even if I already have several pictures of a cultivar, if it has a nice bloom today I'll take another picture. At the end of the season I'll weed out the poorer pictures.
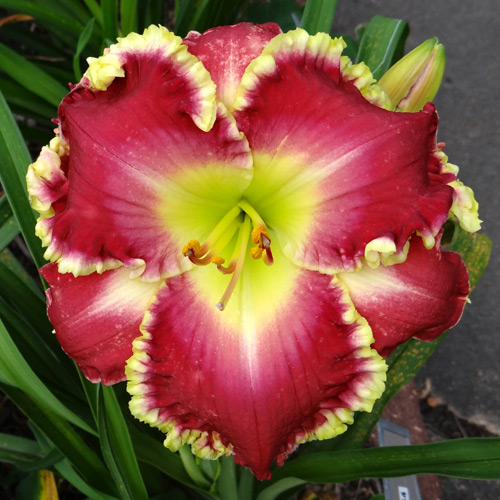
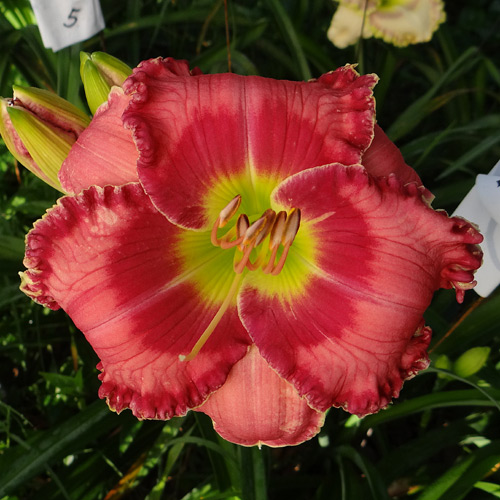
Seedling 13-069
This is seedling 13-069. It has 6" blooms on 28" scapes. Bud count hasn't reached 20 yet but it's close. It comes from the cross (Orange City X Caribbean Magic).
|
| May 9th, 2017 |
I've spent the past couple of days visiting other growers daylily gardens. I like to see how other growers manage their gardens and especially what new seedlings they have. I took a bunch of pictures and I hope to post some here later in the summer.
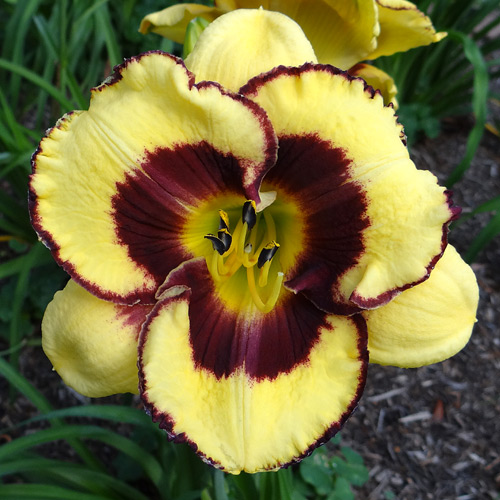
Hybridizer's Nightmare
If you've followed this blog for a year or more you've probably seen what I call "passerby" seedlings. One look, and then you pass 'er by. They have a pretty face but upon further inspection they have so many faults that it would be folly to even try to evaluate them. Today's image is one from this year.
No, it's not registered as Hybridizer's Nightmare but it sure would deserve the name. I saw it from a couple of rows away and thought "hmmmmm, that's interesting" The bloom was attractive but when I got closer I found the scape was only about 12", the bud count was only 2, and the foliage was puny... and this is the second bloom year for this bed.
|
| May 7th, 2017 |
One of the more common questions I get is how far apart should daylilies be planted. My response has always been that I typically plant them about 18" apart. I have always used this spacing because it allowed me to grow as many different cultivars as possible in the space I have available. Being a working garden, having lots of variety was important. I did however suggest that if they had enough room the spacing could be increased.
When I planted the new bed I built last fall, I ended up spacing some of the daylilies about 24" apart. The result was that this spring I was able to enjoy the beauty of properly spaced daylilies. At 18" the foliage of each plant is jammed together with nearby plants. At 24" however, the graceful beauty of the fans can be appreciated. So if you have the space, I recommend using 24" spacing.
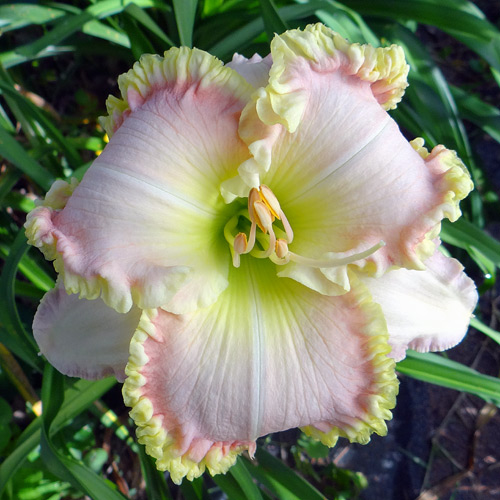
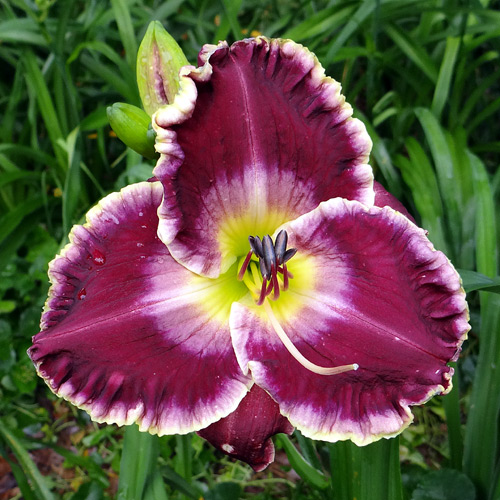
Seedling 15-075
Today's image is seedling 15-075. It has 6.5" blooms on 28" scapes. In this picture all three blooms were open on the same scape.
|
| May 5th, 2017 |
Last Saturday, the Houston Hemerocallis Society held its annual daylily sale. These sales are a good place where people can purchase daylilies locally at reasonable prices. If you are looking for places to purchase daylilies, find out if you have a local club. Contact them or check their website as most will have at least one sale each year. You can find information about local daylily clubs on the American Hemerocallis Society website.
Saturday was a very pleasant day with overcast skies, a nice breeze, and no rain. The atmosphere was relaxed and we were able to visit with the customers and answer their questions.
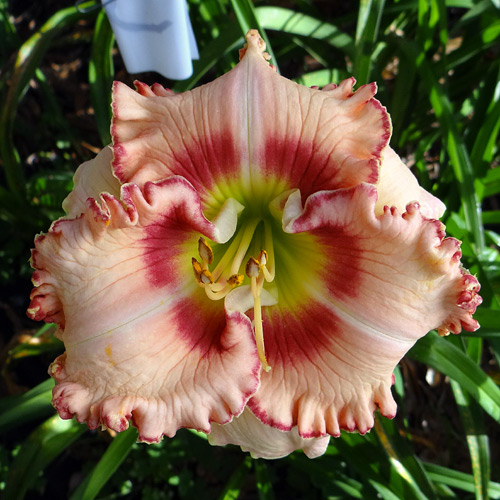
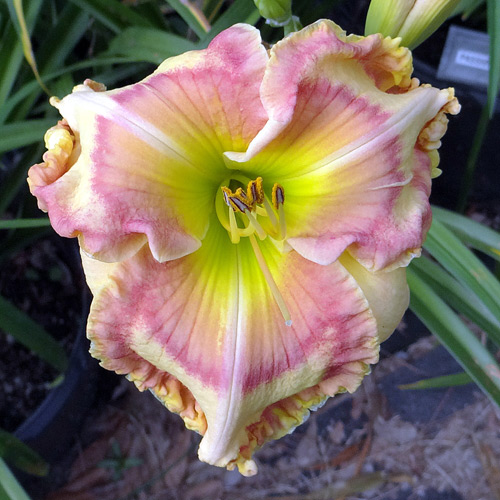
Seedling 15-006
This is seedling 15-006. It has 6" blooms on 26" scapes. It comes from the cross (Mississippi Memento X Thomas Tew). You may have noticed that recently I haven't been giving bud counts for many of my seedlings. This is because I transplanted almost everything in my garden during the winter which set the plants back. Bud counts are meaningless until the plant has a chance to get fully established.
|
| May 3rd, 2017 |
Sometimes I'm asked how I select seedlings for further evaluation. A few seedlings are 'no brainers' - they have a great bloom, nice branching and bud count, and are vigorous growers. Then there are the ones that may not have all the traits that spell a winner but have enough positives that show they have good potential.
Others however, take more analysis mixed in with a little 'best guessing' as to what the seedling might do in the future if given good growing conditions. Sometimes the bloom may be decent but not special but the bud count and branching are better than average for a new seedling. Sometimes it's an attractive bloom but the plant's performance isn't where you'd like it to be. If there's room in the evaluation beds, I try to grow these for a couple of years to see their true potential. Some nice surprises have happened.
But probably the advice I think is most important for a hobby hybridizer who isn't blooming thousands of new seedlings every year is to select what you like. When not hybridizing for profit it gives you a lot of latitude in your selections. Keeping what you like will go a long way toward giving you a sense of success. Even if a seedling has a relatively low bud count, if it makes you smile when you see it bloom every year then it's a keeper in your eyes.
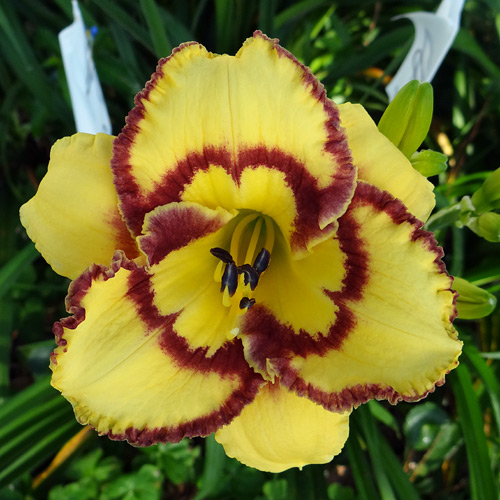
Seedling 16-084
Today's image is seedling 16-084. It has 5.5" blooms on 28" scapes. It comes from the cross (Rose Sensation X Magical Marrakech).
|
| April 27th, 2017 |
One of the recommendations I always heard is that one should always let a new seedling bed bloom at least twice before clearing it out. Having very limited space I didn't have the luxury of letting a bed bloom for a second year. I always needed the space to plant the next crop. One year I left half of one of my seedling beds so I could see what the second year blooms looked like. I did get a few additional seedlings worth further evaluation but no where near enough to make it worth while. So I went back to clearing the bed after only a single bloom season.
Because I'm no longer planting new seeds, I left the last bed to bloom for a second year. I have been pleasantly surprised in the number of seedlings that I have marked in this second year that were not marked the first year. So my recommendation is to allow your seedlings to go through at least two bloom seasons before you clear out a bed for replanting if possible.
Seedling 16-057
Seedling 16-157 is a case in point. I didn't mark this seedling during the first bloom year. I don't know if it just looked bad or maybe it didn't bloom at all. Nevertheless, it did make the cut this year. It has 6" blooms on 22" scapes.
|
| May 24th, 2017 |
Another cool morning just like yesterday. Unfortunately, after two cool nights many of the daylilies didn't open very well this morning. Still I did find a couple of new ones that looked good enough to mark.
Seedling 16-130
Today's image is seedling 16-130, another that's new this year. It comes from the cross (Barbie's Favorite X Prissy Girl). It has 5" blooms on 23" scapes.
|
| April 23rd, 2017 |
Woke up to temperatures in the lower 50's this morning. I was pleased to see that many of the daylilies opened quite well despite this cool start to the day.
Seedling 16-143
This is another seedling from the new crop. It comes from the cross (Violet Stained Glass X Serengeti Sunrise).
|
| April 22nd, 2017 |
This morning I held my daylily yard sale and had a great time. My only regret is that there was a larger than usual crowd and I didn't have time to visit with the buyers as I would have liked. I have held these annual sales for over 25 years but today's sale was bitter sweet as it was the last one. I am no longer making crosses so I no longer need to purchase new daylilies.
Daylilies multiply quite well and selling the increase over the years has allowed me to buy newer daylilies for my hybridizing program. While you don't have to have the latest and greatest daylilies to hybridize, having newer daylilies can increase your chances of having good results.
While I'm no longer making and planting new crosses, I still have a lot of seedlings under evaluation and am hoping there will be a few more registrations yet to come.
Seedling 15-101
Seedling 15-101 is one of those seedlings that barely made the cut the first year it bloomed. The second year it didn't do much better but because it had been recently transplanted, I decided to give it another year. Today it rewarded me with a couple of nice blooms (this is one of them).
|
| April 20th, 2017 |
I've been busy getting ready for my annual daylily yard sale which will be held this Saturday. I did however stop briefly this morning to take a few pictures including Bella Vita below.
Bella Vita (Jarvis 2011)
Bella Vita will be available in Saturday's sale.
|
| April 16th, 2017 |
Yesterday it was time for my daylilies to get their annual 'spring tonic'. I mixed it up in a 5-gallon bucket and applied about a quart to each clump. I started using a spring tonic years ago using the 'Hooker Formula'. I no longer use Hooker formula but I've continued the annual practice using my own recipe. The following is what I use to mix 5 gallons:
- Soil microbe innoculant (amount depends on which product is used) - this contains beneficial soil microbes and mycorrhizae which improves the roots ability to absorb nutrients.
- Agricultural molasses (4 oz.) - feeds the beneficial microbes increasing their numbers helping them to establish throughout the soil.
- Liquid humus (4 oz.) - probably the most important component in soil. I'll post about humus at some point but you can google it for lots of great info.
- Epsom Salt (Magnesium Sulfate) (5 oz.) - Both magnesium and sulfate are essential to plant growth. Adding epsom salt produces better flowers and greener foliage.
- SuperThrive (a couple of squirts from medicine dropper) - SuperThrive is said to contain 50 vitamins and hormones which improve plant performance. It won a gold medal at the World's Fair in 1940. It has a loyal following but there have been no official studies proving it does what it claims. I have some left over from a business venture and I'll continue using it until I run out. I probably won't purchase any more as the product is fairly expensive.
- Sequestrene (Iron Chelate) (1 Tbsp.) - A small amount of Iron is necessary for the production of chlorophyll in plants. Because I don't know the iron content in the soil I bring in for my 7-gal pots, I add this small amount of Sequestrene.
Seedling 16-145
Seedling 16-145 is another first year bloom. What caught my eye was the heavy ruffling. There is also some green showing in the edges of the ruffles. It comes from the cross (Springtime Romance X Crystal Smith).
|
| April 15th, 2017 |
Continuing on yesterday's rust thread... Fungicides are grouped into codes known as FRAC codes. FRAC stands for "Fungicide Resistance Action Committee". Basically, each code indicates a different mode of action. Daylily rust can quickly become resistant to a fungicide if that fungicide is the only one being used. In some cases as little as three consecutive applications can result in resistance. Furthermore, it may at the same time become resistant to other fungicides that have the same mode of action (same FRAC code).
Fortunately, the fungicides in three of the FRAC codes have shown to be effective in controlling rust. Alternating between fungicides in 2 (or better yet all 3) of these FRAC codes will generally control rust without it from becoming resistant. The recommended spray frequency is every 7 to 10 days during the peak rust seasons (spring and fall). The following is a list of the 3 FRAC codes and some of the products in each.
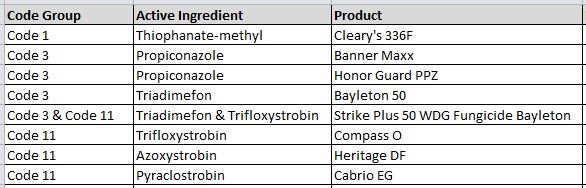
Systemic fungicides effective on daylily rust
There are also a couple of other FRAC codes that contain fungicides used against daylily rust. The difference between these two FRAC groups and the three groups above is that codes 1, 3, and 11 are considered 'inhibitors' (their action inhibits rust spores from forming) while codes M3 and M5 only kill existing spores on contact. They do nothing to prevent new spores from forming. When rust is present, adding one of these contact controls to the inhibitor spray mix will have a beneficial effect.

Contact fungicides effective on daylily rust
Disclaimer: The above information has been gleaned from web research and I believe it to be accurate. But if you know any of the above is incorrect, please let me know.
Seedling 16-135
This is another of this year's new seedlings. 16-135 has 5" blooms on 24" scapes.
|
| April 14th, 2017 |
Even though I have been spraying for rust regularly, I was surprised to see rust make an appearance in a few places in my garden. At first I wondering if I had just done a poor spraying job and had missing these areas. Then I realized the problem. Two of my three fungicides had obviously passed their expected shelf life and were probably no longer effective. I had been using the same jug of Cabrio for so long I couldn't even remember what year I had bought it and the Bayleton was even older than that. Fortunately, my spray schedule for today called for Cleary's 336F which was only purchased last fall.
Replacements for both of the old fungicides should arrive early next week. I purchased Honor Guard PPZ to replace the Bayleton and Heritage DF to replace the Cabrio. Both have a higher cost per gallon than what they are replacing but they were available in smaller packaging. That way I shouldn't have to discard any due to expired shelf life. I'll post more about rust control fungicides in a future post.
Hedwig's Eyes (Jarvis 2005)
Today's image is Hedwig's Eyes, taken in the new bed yesterday. This will be available in my upcoming yard sale.
|
| April 13th, 2017 |
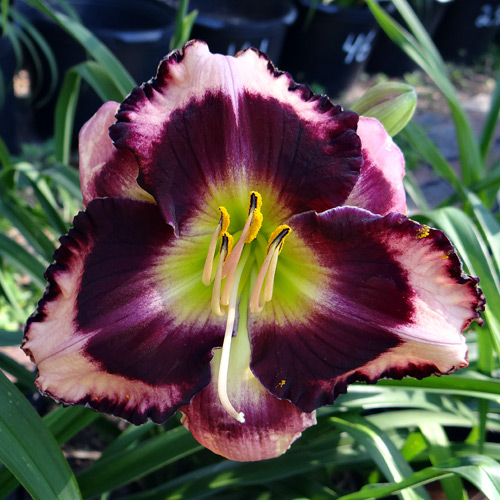
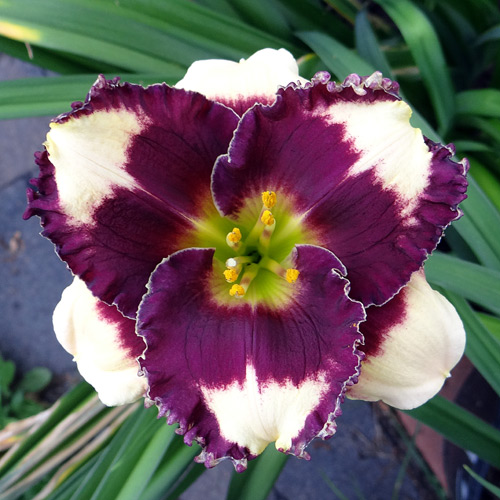
When a seedling blooms for the first time it doesn't always look like it will in subsequent years. Sometimes seedlings can exhibited exciting and unusual traits that unfortunately disappear after the first year. More common are seedlings that may be rather mundane looking the first year but turn out to be really nice daylilies. In marking first bloom seedlings, one needs to make some guesses as to what the blooms might look like in future years. The key is to flag and photograph those that you think might improve so they can be checked again the following year. In most cases the second year blooms look pretty much like the first year (maybe a little bigger) but in some cases there can be dramatic changes for the better.
Seedling 16-013
Seedling 16-013 is one of those that far exceeded its first year bloom. I almost didn't flag it last year. The color was weak and muddy and it didn't open very well but the edge showed possibilities, so I marked and photographed it. It comes from the cross (Blue Eyed Angel X Celestial Shore). This is how it looks this year.
|
| April 12th, 2017 |
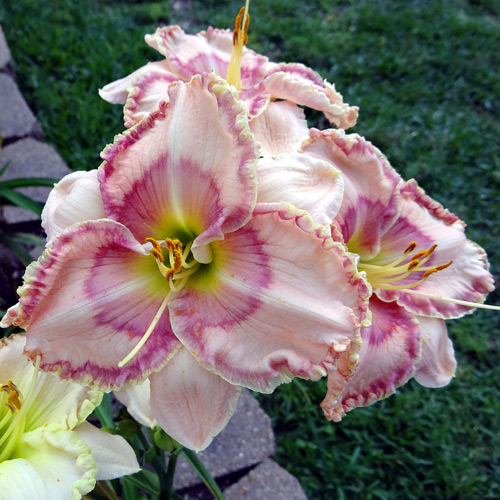
One of the things I go through every year is what I call 'early bloom let-down'. In my garden daylilies have always bloomed their best when night time temperatures are in the upper 60's to low 70's and daytime temperatures are in the 80's to low 90's. Early in the bloom cycle low temperatures can range from the 50's to 60's with highs barely reaching the 80 degree mark. This leads to smaller than expected blooms that often don't open as nicely as when the weather is warmer.
As bloom season nears, it's normal to remember what the previous season's peak blooms looked like - fat buds opening large, perfectly formed blooms. This gives me the expectations of 'picking up where things left off'. With the early cool temperatures however, that usually doesn't happen and thus I experience 'early bloom let-down'. It happens to me almost every year but knowing it happens doesn't make it any easier. The good news is that things are starting to pick up and blooms are getting better.
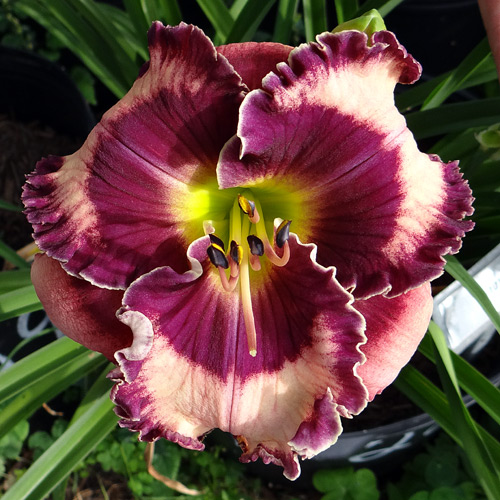
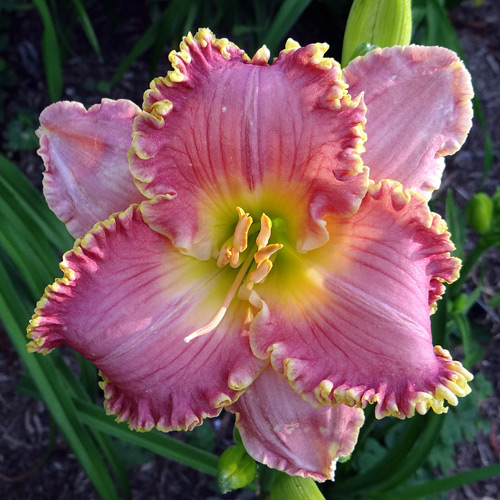
Jessica Lynn Bell
This is a picture of Jessica Lynn Bell from last year's garden. You may recognize this as the cultivar I use in the banner at the top of this page. Ever since its first bloom it has been one of my favorites. The full form, large etched pink eye, and double edge incorporate much of what I prize in a daylily. This is another cultivar that will be available in my upcoming yard sale.
To see the complete list of sale plants click here .
|
| April 11th, 2017 |
Nice rain today - a total of 1.5" fell over the course of several hours. I did get a chance to take some pictures before it started.
Unless you have a photographic memory, taking pictures of seedlings under evaluation are an important part of the process. For the better seedlings I like to take multiple pictures as the seedling goes through its bloom cycle This helps me see how it changes from the first to last bloom. It's also a good idea to take notes when something about a seedling makes an impression, either positive or negative. Combining your notes with the pictures helps later on when making decisions whether to keep or even register a seedling.
Seedling 15-050
Seedling 15-050 is one of the smaller seedlings under evaluation. The bloom is typically about 4.5" on 27" scapes. The bloom opened nicely despite having temperatures around 50 F.
|
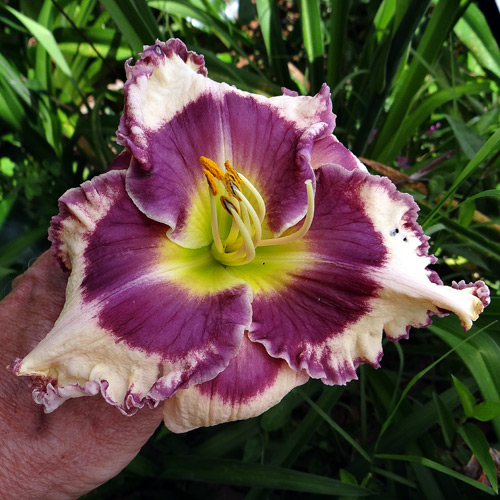
| April 9th, 2017 |
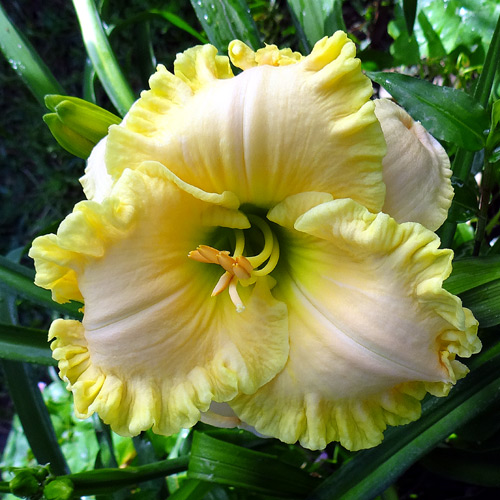
What Love Can Do opened its first 2017 bloom this morning. I transplanted it to the new bed during the winter and it seems to be quite happy with the new location. It has 4-way branching which is a little unusual the first year after transplanting.
What Love Can Do (Jarvis, 2010)
What Love Can Do is another that will be in my yard sale later this month.
|
| April 7th, 2017 |
I'm starting to see a few blooms every day now. Unfortunately, it's the second year to bloom these seedlings and the best seedlings have already been marked and removed. I expect the number of new selections this year to be small.
Seedling 16-129
This is the only new seedling I've marked so far this year. Seedling 16-129 has a 5.5" bloom and comes from the cross {Calamity Jane X (Wild Cherry Round up x Walter Kennedy)}.
|
| April 3rd, 2017 |
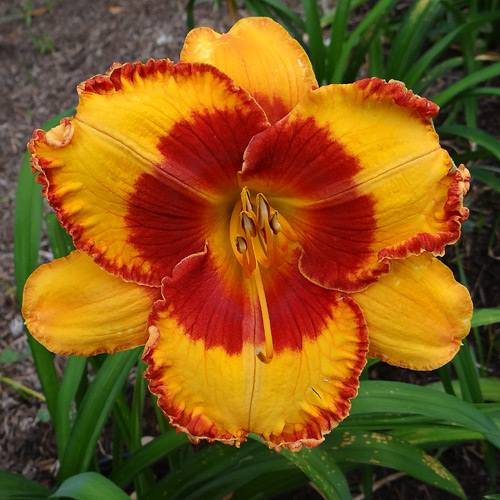
The garden is starting to show nice color with 8 different daylilies blooming this morning. One of the new seedlings showed some promise when it first opened but by mid afternoon the bloom had already started to melt. There are so many things that are considered to be faults when evaluating daylilies. Weak or poor substance is just another of those faults. No matter how pretty a daylily is when it blooms if it looks like wilted tissue paper by late afternoon it just doesn't make the grade as far as I'm concerned.

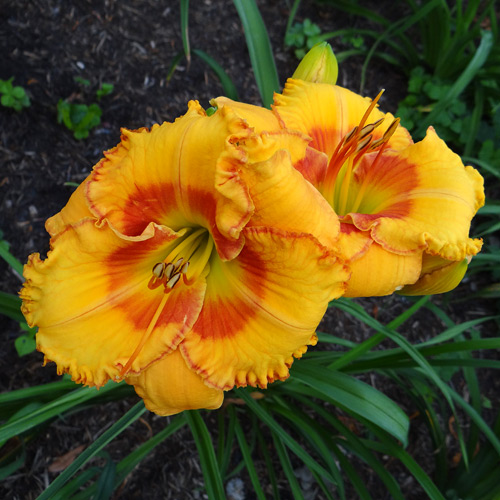
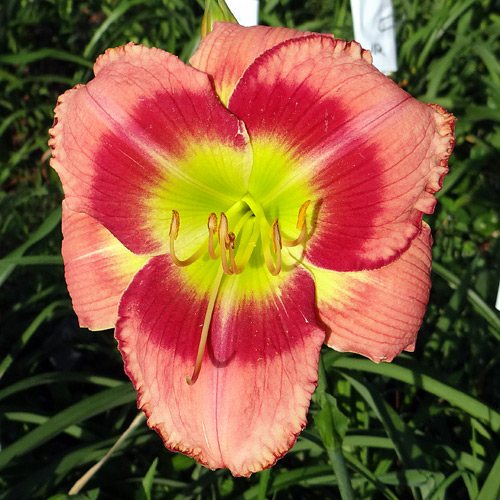
Catching The Light
My first registration to bloom this year is Catching The Light (Jarvis 2003). I took this picture this morning and it was really living up to its name. It's a bright butter yellow with a nice recurve form that really stands out when it's in the sun. The blooms are 5.5" on 26" well branched scapes. When established it can have around 40 buds but has had as many as 55 buds on a single scape. This will be in my daylily yard sale on the April 22nd.
|
Previous Posts
Back to current posts
|