 |
 The Happy Daylily Blog - daylily pictures and thoughts from my garden
|
| April 8th, 2021 |
The daylilies have been growing rapidly and there's still no sign of rust (hooray)! The plants however are somewhat smaller than they would be expected to be at this time of year. The foliage is both shorter and narrower but otherwise it looks healthy. I'm starting to see a fair number of scapes but they too seem thinner than normal and it looks like the bud counts on these earlier scapes are going to be quite low. This isn't unexpected as the plants had to expend a lot of energy to replace all the foliage that was killed off by the freeze. The freeze happened in the spring and there wasn't much time for the plants to replace their expended energy before starting to produce scapes. I'm eagerly awaiting my first bloom which is expected in the next 2-3 days. I don't expect the real show to start until at least another 3 weeks or so. That puts it around May 1st which is about 2 weeks later than usual (of course, just a rough estimate).
If you had any daylilies that appeared to be lost after the freeze, don't give up hope yet. A couple of weeks ago, one that I thought I'd lost put out some new foliage and just yesterday, another that I thought was a goner sent up a couple of tiny new leaves. Now there's only one that I believe is truely lost.
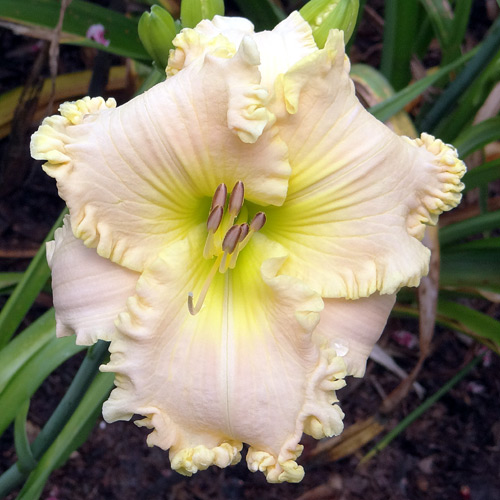
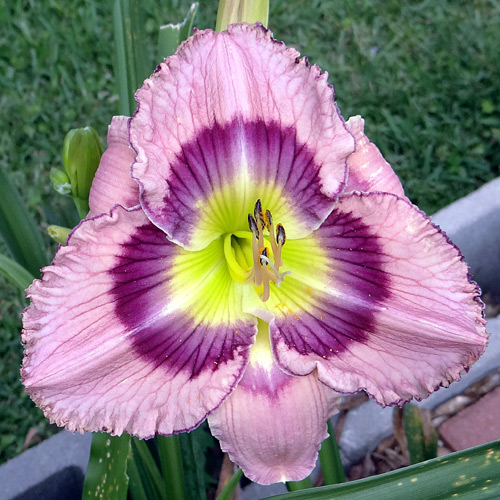
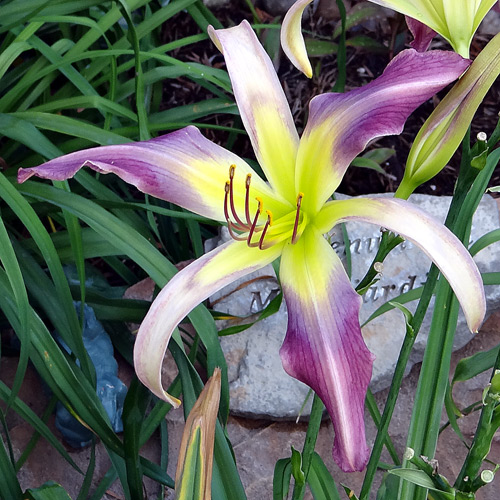
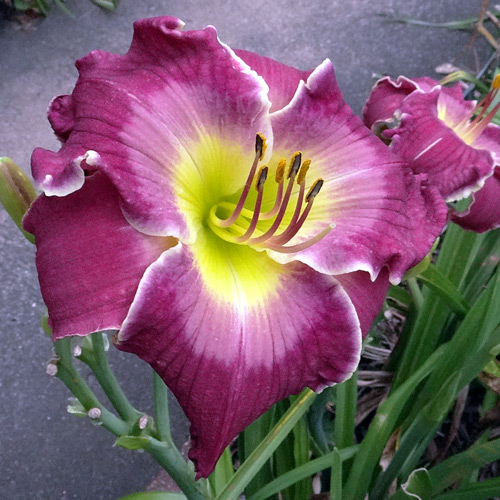
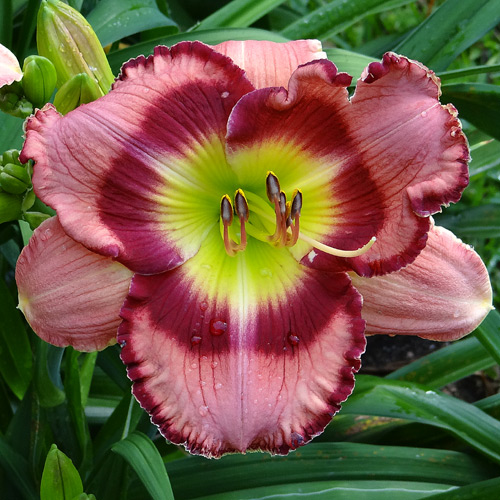
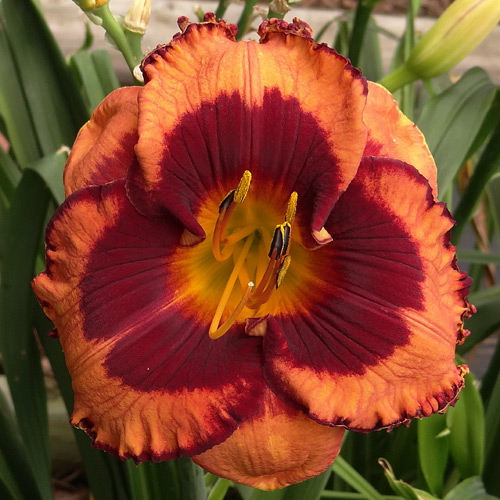
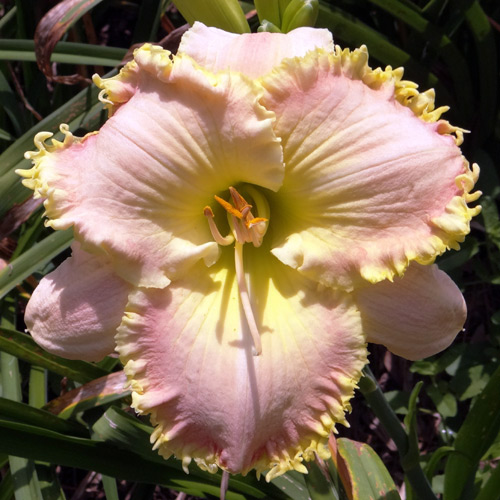
Seedling 05-033
Seedling 05-033 is another of those seedlings that might have been registered if it were not for one major flaw (IMHO). It has 6" blooms on 32" scapes and has carried as many as 28 buds on well branched scapes. It's downfall is that the better it performs one year, the poorer it performs the next. It's one of those that almost blooms itself to death. I keep it around for the good years (smile). It comes from the cross (Victorian Lace X J.T. Davis).
|
| March 25th, 2021 |
The daylily foliage is growing rapidly and while still a little smaller than normal for this time of year, it's getting there. But there's something that's missing from the normal spring garden (and it's a good thing). So far, I haven't seen a spec of rust. I've also heard from a few other southeast Texas daylily folks that they're also seeing no rust. This seems to be similar to what happens in the north where daylily foliage freezes to the ground every year and reemerges new in the spring. Northern growers say that rust isn't a problem because it's killed by the freezing temperatures. In any case, I don't expect to be rust free forever but it will be interesting to see how long it lasts.
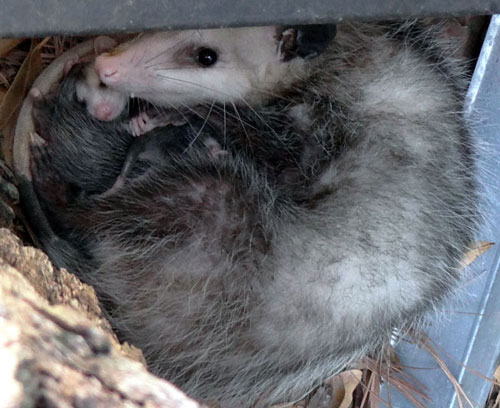
Possum and young
This morning I discovered a visitor, or I should say visitors, curled up asleep between a large pine and the back fence. Although they're primarily a nocturnal animal and aren't seen all that often, they are known to be fairly common in this neighborhood. Mama was asleep but woke when I moved in to take this picture. She seemed to have no fear at seeing me as there was no hissing or growling. I don't know how many young she has. So far I've only seen three.
|
| March 22nd, 2021 |
After the recent hard freeze which killed all the daylily foliage, I wasn't sure what to expect regarding bloom season this year. To my surprise, a few days ago I discovered a couple of scapes already emerging from the new foliage. Both were on LIVE YOUR DREAM. I looked for other scapes but didn't find any which didn't surprise me. After all it is still only March. Still, it's a good sign that bloom season may not be as late as I feared.
Crepe Myrtles budded out a couple of days after my last post and look unfazed after the freeze. That was a relief. The last time we had a freeze similar to this one two thirds of the branches on an absolutely gorgeous Crepe Myrtle in my front yard were killed off and the tree never recovered. The Agapanthus may make it after all as I'm beginning to see some new foliage emerge.
The hawks that nested next door last year are back. I originally mis-identified them as Broad Shouldered Hawks but now believe they are really Cooper's Hawks. This year the nest was constructed right next to my property line so I should have a good vantage point. I'll miss all the songbirds and doves though. Doves and other birds of similar size have already left the area or been caught by the hawks.
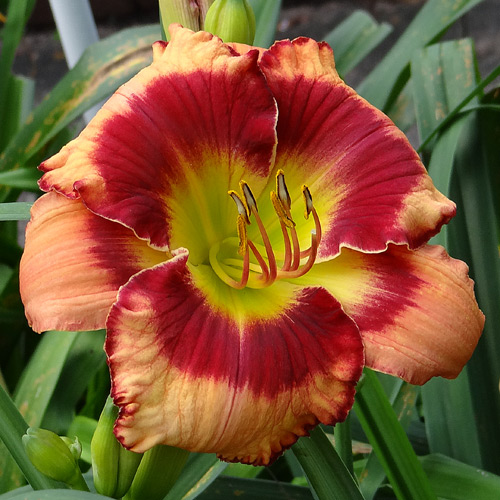
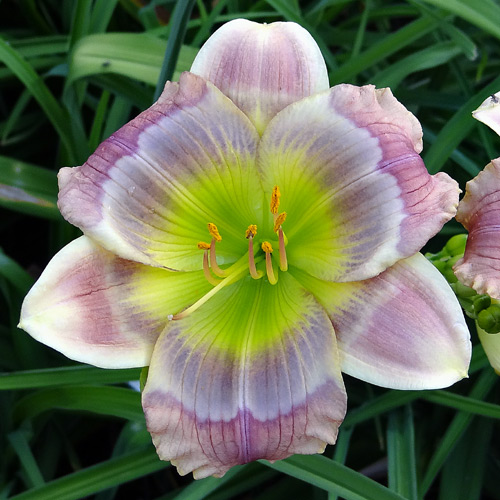
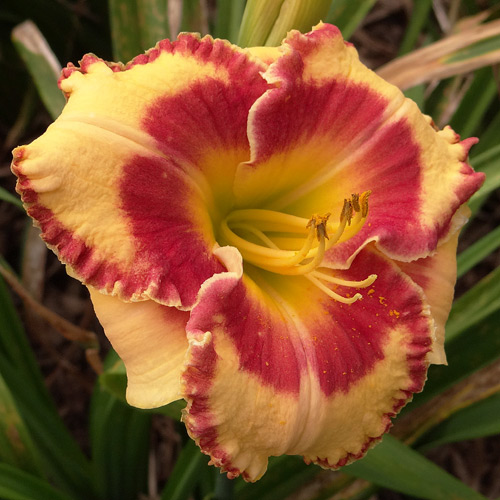
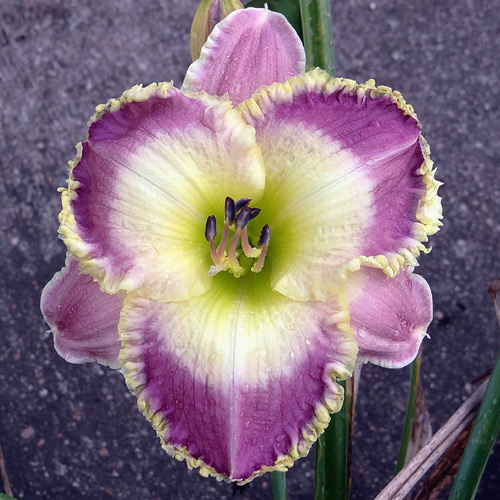
Seedling 15-031
Seedling 15-031 has 6" blooms on 30" scapes. Bud count is in the low 20's with 4-way branching. It comes from the cross Dragon Knife X Bella Vita and is a vigorous grower.
|
| March 12th, 2021 |
Final analysis on how the daylilies faired from the "freeze of 2021" shows that I did lose one seedling and another still hasn't put out any new foliage. The roots on this one are still nice and firm so it may yet make it. There are some cultivars that may have lost a fan or two but the rest of the clumps are fine. Most of the possible lost fans were in cultivars that were transplanted during the fall and may not have fully reestablished their root systems. On a positive note, there is no sign of rust which is usually a problem at this time of year.
The rest of the garden beds have a few losses. There were a couple of Dwarf Firebush that I thought would come back from the roots but it turns out that it's a tropical and doesn't survive hard freezes. So yesterday I replaced them both with a couple of new roses. I also replaced a couple of Asclepias (Milkweed) not because I didn't think they would come back from the ground but because I wanted food available for the Monarch butterflies when they migrate through this spring.
The Agapanthus have shown no signs of life and the Indian Hawthorn look really bad. The Crepe Myrtles always go dormant so I don't yet know how they've fared. Everything else however seems to be bouncing back quite nicely. Even the Purple Heart Wandering Jew I have growing in a large planter is coming back from the roots.
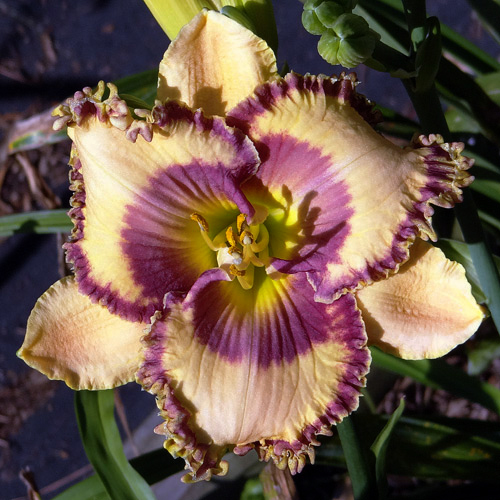
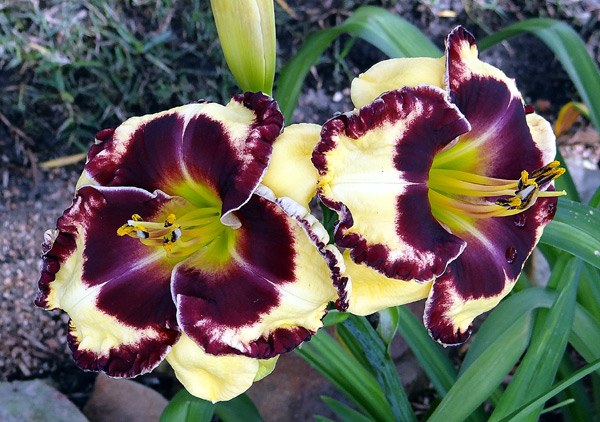
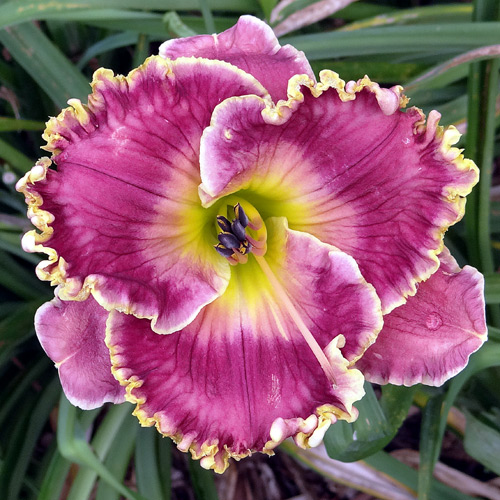
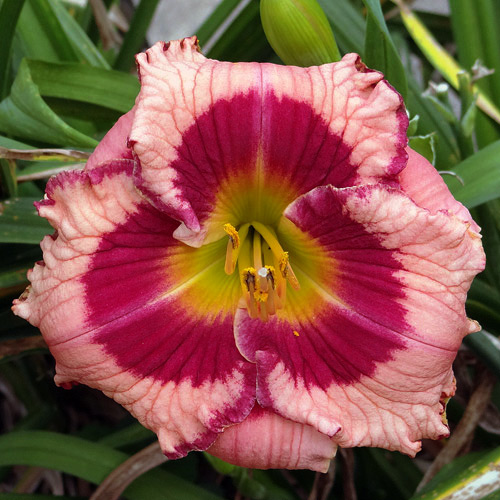
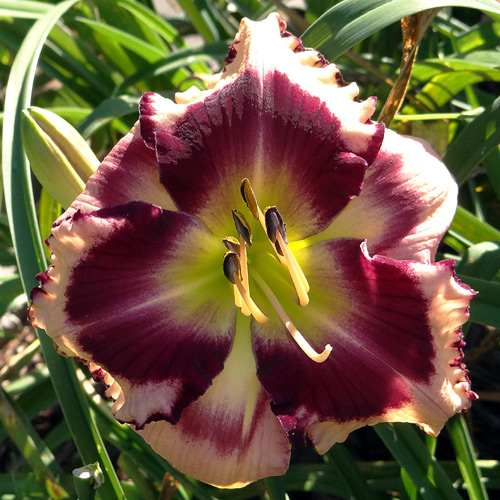
Seedling 14-046
Seedling 14-046 has 5.5" blooms on 24" scapes and comes from the cross (Edwardian Charm X Happy Halloween).
|
| February 25th, 2021 |
The yard cleanup is just about done with only a few roses left to be pruned. I removed the dead daylily foliage back to the point where a little green was showing. A couple of days later, many of the fans had already put out a half inch of new green growth. I wonder what this year's bloom will be like. Last year my first bloom was less than 4 weeks from now but this year bloom will probably start much later.
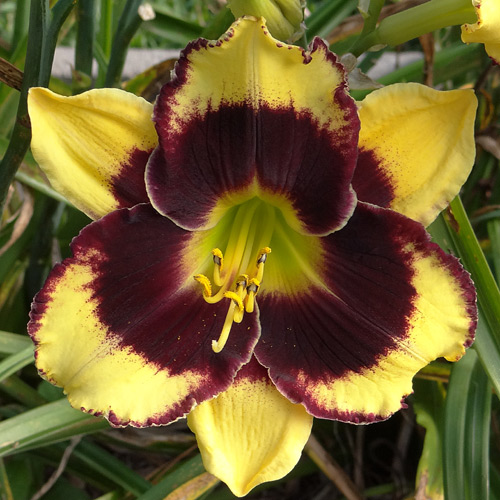
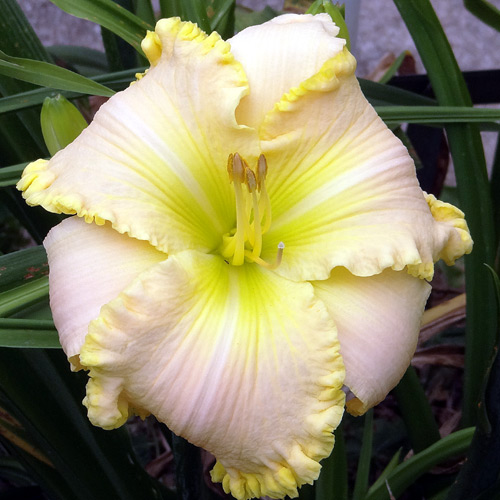
Seedling 16-069
Seedling 16-069 has 6" blooms on 27" scapes and comes from the cross (Unspoken Love X (Exotic Treasure x (Hedwig's Eyes x Spacecoast Gold Bonanza))).
|
| February 16th, 2021 |
The garden looks totally different this morning. The temperature is currently 18 F after an overnight low of 12 F which is most unusual for along the gulf coast. It has been cold for several days now with sleet and snow a couple of nights ago. Most of the foliage in my garden probably won't survive this level of cold but most plants should survive and come back from the roots.
Daylilies of course should be fine. Back in 1980 there was a similar cold spell and most daylilies came through it just fine. I did lose a couple of cultivars back then but that was because the ground was very dry allowing the freeze to go deep into the soil. I now know that watering prior to a hard freeze fills the air spaces in the soil which allows only the surface to freeze thus insulating the roots. No problem with dry soil this time as it rained about a half inch prior to the cold moving in.
All daylily foliage has been severely burned by the hard freeze. None of it will survive and once this weather pattern breaks I'll remove it to facilitate the emergence of the new growth. Note that if this freeze had happened in the beginning of winter, I would leave the dead foliage until spring as it might provide some insulation to any new growth should there happen to be a second hard freeze.
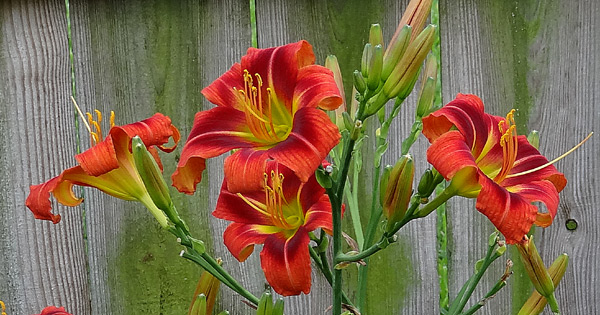
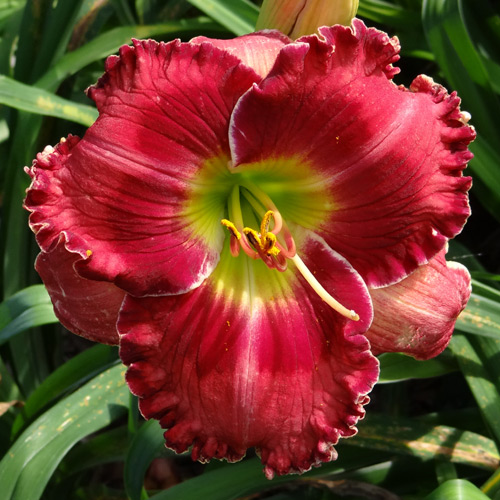
Tango Dos (Shooter-E, 2012)
Tango Dos has 4.5" blooms on 36" well branched scapes. It is registered as a dormant but seems to do quite well here in the south as this picture taken in Lake Jackson, Texas shows.
|
| February 8th, 2021 |
I have now finished mulching the daylilies with shredded leaves. Last year (the first year using leaves) I needed about 60 bags of shredded leaves to cover all the beds. Not all last year's mulch has decomposed so I had no idea how many bags to shred this year. I ended up shredding about half the number as last year and it turned out to be more than needed. 20 bags probably would have done the job as I have about a dozen bags left over.
Yesterday I sprayed for aphids. I spotted the first arrivals about 3 weeks ago but not being in large numbers (and with many other projects demanding attention) I held off. My insecticide of choice for early spring control is Bonide Systemic Insecticide. It works for about 30 days so it also gets any subsequent generations that show up. In addition I added some propiconazole (generic Banner Maxx) and Dithane 75DF to the mix to begin my spring rust control program.
This year I've decided to start a pot garden to grow some vegetables. I'm using #7 plastic pots which are about 14" high with a 14" diameter. I made my own mix for the pots consisting of 1-part Coco Coir (a growing medium made from ground coconut shells), 1-part fungal compost, and 1-part recycled large container soil which has a high content of sand and small gravel up to 1/4" diameter. I haven't had a great history of designing my own potting soils so we'll see how this goes (smile).
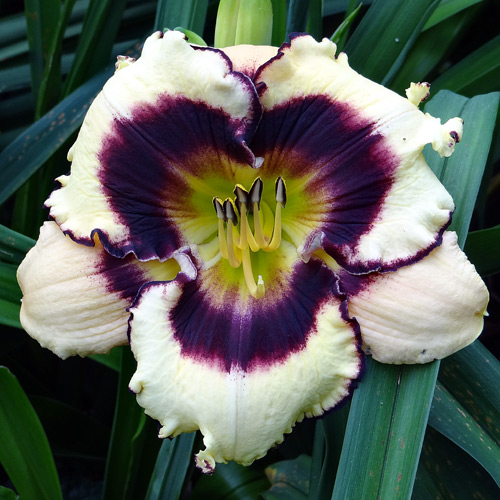
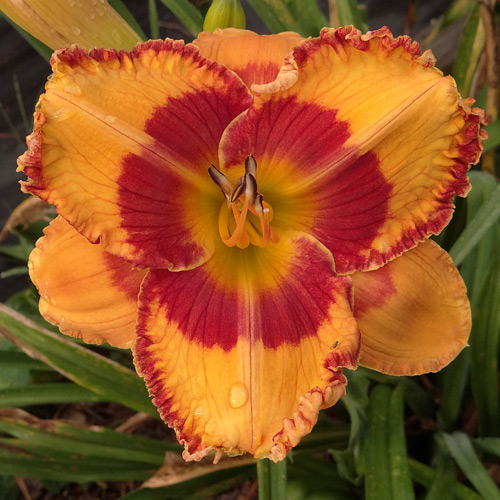
Seedling 05-038
This is seedling 05-038. It has 6" blooms on 30" scapes and comes from the cross (Edge Of Heaven X J T Davis). The bloom has really nice form and gold edge. Unfortunately, it isn't a consistent bloomer. One year it will do very well with bud counts in the mid 20's and it reblooms. The problem is that a heavy bloom reduces the vigor of the plants to the point that they may struggle to survive during the summer heat. This results in smaller fans the following year and bud counts only in the low to mid teens and sometimes no rebloom. I like the bloom so I keep it around for the good years.
|
| January 24th, 2021 |
Every year I take pictures of the daylilies in my garden. This past year I decided to make the leap and take videos along with pictures. I have assembled some of the clips into a video and posted it on my Hemerocallis The Daylily website. Click here and a link to the video titled "2020 Virtual Garden Tour" is at the upper left.
Flamingo Wings (Jarvis, 2014)
|
| January 20th, 2021 |
The plan was to spread mulch in all the beds but sometimes things don't always go as planned. I had just finished mulching one section of the largest bed when I realized that if I was going to do a light spring fertilization, I should do it before I spread the mulch. Then I realized that before I fertilize, I should remove some of the perennial weeds that were making their spring appearance. There were little or no annual weeds but the Oxalis and Rattlesnake Weed was tall enough to impede proper fertilizer distribution. Many are probably familiar with Oxalis. Once you get it, it's near impossible to eradicate. It spreads by both little bulblets that are formed around each mature bulb and by producing seeds. Rattlesnake Weed is probably less common but just as invasive and also impossible to eliminate. It spreads by underground runners and gets its name from the tubers that look like white rattlesnake rattles that it produces along the runners. But I digress... the beds have now been weeded and fertilizer spread so I'm now ready to spread the mulch.
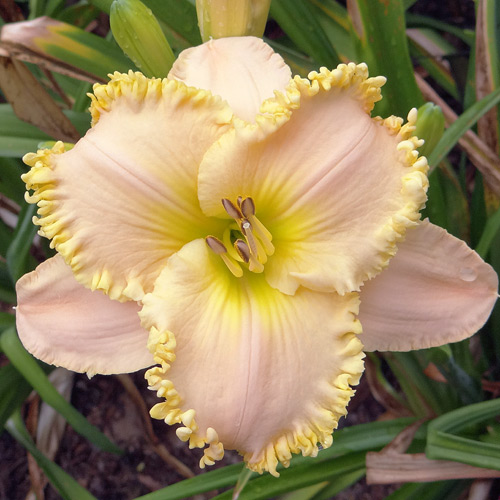
Winged Waterfall (Lambertson, 2010)
Registered as 10.5" blooms on 36" scapes
|
| January 15th, 2021 |
Today I finished shredding leaves to use as garden mulch. I only shredded about half as many bags as last year because there still some of last year's mulch in the beds. Tomorrow I'll start spreading the new mulch.
Shredding dozens of bags of leaves is a time consuming process but the effort has been worth it. For years I have spent many hours pulling weeds in the daylily beds but last year only an occasional pass through the beds kept the few weeds that sprouted in check. While a good layer of mulch prevents a lot of annual type weeds from sprouting, it doesn't do anything to control perennial weeds that have already established such as Oxalis or nutgrass.
Ringed Emerald (Lambertson, 2016)
|
| January 10th, 2021 |
There's not much going on in the gardens right now so I really haven't had much to write about. Temps have remained above freezing but still a little too cold for my liking. On the few mild days between rainy cool fronts I have been collecting and shredding leaves to use as mulch. I still have about a dozen bags left to shred. I've been concentrating my time on trying to catch up on my other household projects so I'll be free to spend my spring in the garden!
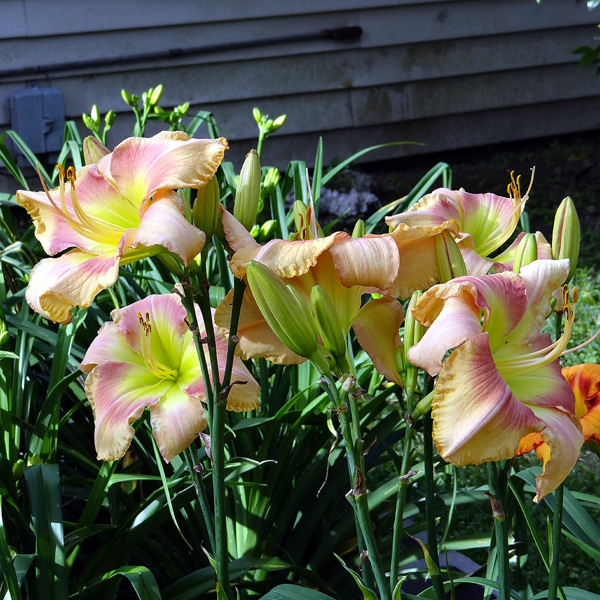
Charleston Charm (Trimmer, 2013)
To wet your appetite for the upcoming spring bloom, I've decided to post some pictures that I previously took in other local daylily gardens.
|
| December 10th, 2020 |
I just finished double potting the second daylily bed (see November 21st post). This bed lies just under the drip line of a neighbor's large Oak tree. The first bed was a piece of cake compared to the second bed. I watched a YouTube video recently where they had dug up a small oak and washed all the soil from the roots. The purpose was to show what the oak root structure looked like. What I saw in the video was exactly what I encountered while digging each 9" deep hole for the pots. Large branched support roots with smaller roots coming off them terminating in clusters of feeder roots. The larger roots (up to 1" or so) were very hard and required using the shovel like a long handled chisel to cut the roots so they could be removed. The good news is that now that the pots are in place, they will last for years.
The daylilies are putting on some nice new foliage. The older foliage has quite a bit of rust damage unfortunately giving the entire bed a less than pleasing appearance. Because I spent my time digging and moving daylilies, I never got around to spraying again for rust. At this point the rust seems to be inactive so I'm just going to wait until daytime temperatures are consistently in the 70's before I start spraying again. I still have a lot of projects to complete while the weather if cool.
Seedling 12-014
This is seedling 12-014. It has 6" blooms on 29" scapes and comes from the cross (Face Paint X Hedwig's Eyes).
|
| December 6th, 2020 |
It's been a while since I last posted but that doesn't mean I've been kicked back doing nothing. I printed and affixed labels to 6-7 dozen potted daylilies and delivered them to the Houston Hemerocallis Society grow site for their spring sale. I also updated some of the cultivar signs (new and replacements). Winter weeds are now starting to show as the shredded leaf mulch is becoming thin in some spots so I've had to spend time in a failed attempt to keep up with them. I already have several bags of leaves waiting to be shredded and should pick up more tomorrow. Then the shredding and spreading begins!
My current project is root pruning in a couple of my daylily beds. No, not the daylily roots... I'm pruning tree roots. With tree feeder roots running throughout a bed, during the summer the trees suck all the moisture and nutrients from the beds causing the daylilies to suffer significantly. Extra watering and fertilizer doesn't help much because it just encourages more tree feeder roots to form. So I've been cutting a circle around each daylily clump using a shovel being careful not to get too close to the daylily root zone. Each time I push the shovel into the soil, I can feel it cutting through tree roots. This effectively severs most of the feeder roots closest to the daylilies. It will take them another year to grow back giving the daylilies a chance to recover during the coming year. I plan to double pot the two remaining beds next fall.
Seedling 12-089
Today's image is seedling 12-089. It has 6.5" blooms on 26" scapes and comes from the cross (Cimmaron Rose X Priscilla's Smile).
|
| November 21st, 2020 |
This morning I finished one of the sunken pot beds in the front yard (see October 24th post) and I thought I'd post a little about growing daylilies in pots here along the gulf coast.
A few years ago I was growing my daylilies in large pots (7-gal) set on top of the ground. Most of the daylilies survived but they really suffered during our long hot summers. The pots were black plastic which was heated by the sun resulting in hot soil that dried out very quickly. It was so bad that earthworms couldn't survive and I'm sure the soil food web in the pots was also damaged. The answer seemed to be that the pots needed to be sunk in the ground to protect them from the hot sun but the process of sinking 300+ 7-gal pots in the ground was too daunting for me to even consider so I ended up replanting everything back in the soil.
About 10-15 years ago, I had one bed where I grew daylilies successfully in sunken 5-gal pots. That bed was about 30' from the neighbors huge oak tree and I was having to dig the bed up every couple of years to remove tree feeder roots that were sucking up all the moisture from the bed. Pots seemed to be the only solution so I gave it a try and it worked. I eventually eliminated that bed as part of my cutting back but I learned a lot from the experience.
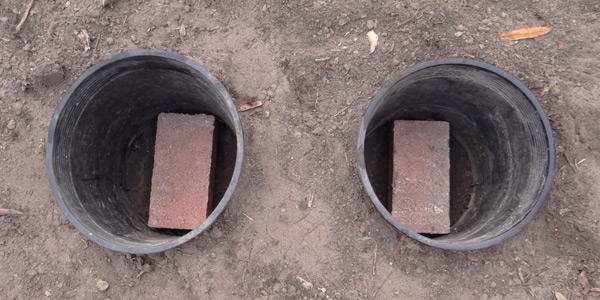
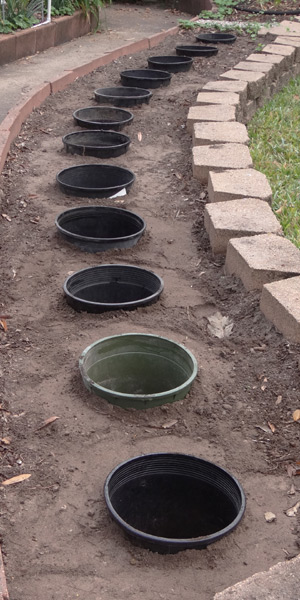
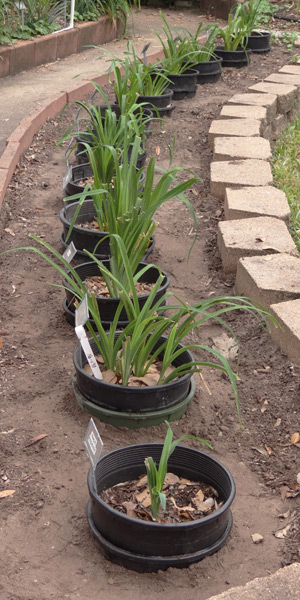
The first thing I learned was the tree roots would quickly find the pot drainage holes entering and filling the pots with feeder roots. The answer to that was double pots (2 identical pots) to provide an air space between the outside soil and the pot soil. This seemed to work but eventually the roots still found their way into the inner pots. I found that removing the inner pots about once a year and removing any roots that had made it into the air space before replacing the pots for the most part solved this but there was another problem. The inner pots frequently became tightly nested in the outer pots making it very difficult to remove for root removal. The answer to this was to place a brick between the inner an outer pots. The brick should be just thick enough to prevent the inner from becoming wedged inside the outer pot making it easy to remove each pot and clean out any roots that had invaded the air space.
The top image below shows the bricks inside the pots. The second image shows the outer pots sunk in the ground and the third image shows the end result with the inner pots and daylilies. The outer pot is about an inch above the soil surface so that mulch can be added without concern of it entering the pot. Once the daylilies grow out, from a distance you can hardly tell they are growing in pots.
|
| November 15th, 2020 |
I finally finished my daylily digging and dividing. Dozens of extra fans have been potted for my daylily club plant sale and seedling clumps that had gotten too big for their allotted space have been thinned out. I would guess that almost 50% of the garden has been dug up. In each planting hole, a shovel of compost was added prior to setting in the daylilies.
I paid special attention this year to making sure all new plantings were mounded up a little above the surrounding soil. After planting, the soil will settle and if I don't start with a little extra elevation the fans will end up in a depression after the soil settles. I think I have gotten a little lax about this during the past few years.
Today I did a complete walk through making sure all my garden maps matched my markers. Some markers had reached the end of their lives and I replaced those. There's still lots of garden tasks to do and the weather remains perfect!
Seedling 14-001
Seedling 14-001 has 6" blooms on 22" scapes and comes from the cross (Calamity Jane X Mississippi Memento).
|
| November 6th, 2020 |
I've been very busy moving daylilies around in the beds. I've potted everything up in two of the front yard beds. If I had realized that I was going to have to do this I could have done more but I didn't have the pots available. So instead I've been digging up the daylilies, removing as many tree roots as possible, and then replanting the daylilies. It's a slow process but rewarding none-the-less. Just like a runner gets a runner's "high" after a long run, I often feel like I'm experiencing gardener's "high" at the end of the day (smile).
Seedling 15-102
Today's image is seedling 15-102. It has 5.5" blooms on 27" scapes and comes from the cross ((Sunshine Kisses x seedling) X Fool's Errand).
|
| October 29th, 2020 |
Another benefit I've seen to using shredded oak leaves for mulch is the significant increase in earthworms. As I'm digging I'm seeing worms in almost every shovel of soil I turn over. Last year (before the leaf mulch) I saw only the occasional worm.
We are now experiencing the first real cool front of the fall season. Temperatures were in the mid 40's this morning. It won't be long before the leaves will fall in earnest and I'll be driving my pickup around the neighborhood picking up the bags left for city recycling. I collected 60 bags last year but shouldn't need that many this year. Oak leaves, the most common tree in this area, break down fairly slowly and there's still some mulch from last year that has not yet decomposed. About 40 bags should be enough this year IMHO.
Seedling 13-102
Seedling 13-102 is one of those seedlings that has been given one final chance to perform. It did better this past season after moving it from a pot into the ground. I'm hoping it will be happy and show me it's worth keeping. I like the bloom but it's terribly slow to increase. It has 5.5" blooms on 29" scapes and comes from the cross (Moonlight Sail X Violet Becomes You).
|
| October 24th, 2020 |
The weather finally cooled down and I was able to work in the garden all day today. I discovered that the tree root problem in the front beds was even worse than I thought. One bed in particular was a solid 3" deep mass of roots even after being dug up only one year ago. I made the decision that I was going to have to go back to growing in pots for these beds.
The process is fairly simple. For each cultivar I need two pots of the same size (in my case 5-gallon) and a brick. The first pot is buried empty leaving the top 2 inches above ground. I then put a brick (or half brick) in the bottom of the pot. The cultivar is planted in the 2nd pot which is placed in the empty pot. The brick needs to be thick enough that the two pots do not tightly nest together. This allows me to easily remove the top pot once or twice a year to remove any tree roots that have grown through the holes in the bottom pot.
Seedling 13-048
Seedling 13-048 has 6.5" blooms on 27" scapes. While it has many good traits, it has one that I personally don't particularly like. It has a bud count in the low 30's which is good but it doesn't start blooming until after the weather has turned hot. The heat often causes multiple blooms to open on each scape, frequently for several consecutive days. The result is the plant is only in bloom for a short time even with a bud count of 30. It does rebloom but the same thing happens. It comes from the cross (Daydream Spirit X Steve Martin).
|
| October 18th, 2020 |
I happy to announce that I have registered 9 new daylilies for 2020. You can see pictures on my Hemerocallis The Daylily website.

Seedling 14-070
Today's image is seedling 14-070. It has 5" blooms on 24" scapes and comes from the cross (Springtime Romance X Emerald Bay).
|
| October 15th, 2020 |
As I'm digging up daylilies, I'm finding lots of tree roots. The trees have figured out where the food and water is and are concentrating their feeder roots near and often intertwined with the daylily roots. This goes back to the drought of 2011 when water restrictions meant that the daylilies got water at the expense of other parts of the yard. The trees figured out where the water was and concentrated on forming roots under the daylily beds. Now that the tree's roots are established deep beneath the daylily beds, when I remove the tree roots from the beds they just grow back from deep in the soil. Daylilies usually take a couple of years after transplanting before they start looking their best. That's about the same time it takes for the tree roots to regrow. The result is that no sooner do the daylilies start looking really good, they start declining because the tree roots are again sucking up all the food and water. I guess I'll have to resign myself to digging beds every 2-3 years or so (sigh)...

Seedling 13-062
Seedling 13-062 has 6" blooms on 25" scapes and comes from the cross (Moon Over Tibet X Spacecoast Gold Bonanza).
|
| October 11th, 2020 |
I have always had seedlings that have nice enough blooms but never perform up to par. I recently discarded quite a few of them but there were a few that I just didn't want to give up on. Yesterday I dug these up, reworked their soil with compost, and then replanted them. Then I warned them that this was their last chance... if they didn't respond well enough they would be history next fall. You may laugh thinking of me talking to my daylilies, but occasionally it actually works. Years ago I had a daylily for 3 years and while it multiplied and the foliage was lush and strong, it had never bloomed. Finally I gave it a verbal warning that I was giving it one last chance. And voil�... it worked (smile and a wink).
Seedling 15-018
This is seedling 15-018. It is a strong grower making large fans with individual leaves up to 34" long. It has 6.5" blooms on scapes up to 36" tall. It is reasonably well branched with bud count in the mid twenties. It comes from the cross (Hedwig's Eyes X Dragon Knife).
|
| October 7th, 2020 |
This morning I went to Nature's Way Resources in Conroe to get a half yard of compost. Nature's Way specializes in natural organic products. The compost I like is 50% fungal compost and 50% leaf mold compost. The fungal compost is made from ground native trees while the leaf mold compost is primarily made from leaves and horse manure. Both are well aged and screened before mixing. I have been using Nature's Way composts for quite a few years now and have been very pleased with the results.
Gina Jarvis (Jarvis, 2015)
Today's image is Gina Jarvis. It has 5.5" blooms on 26" scapes and comes from the cross (Regal Fantasy � Blue Eyed Angel).
|
| October 5th, 2020 |
After some unexpected delays, I finally started my fall garden changes yesterday. This first step involved removing 60+ daylilies from the garden. 24 were from elimation of a small bed so I can grow some tomatos in the spring. The remainder came from a project to reduce overcrowding in a couple of other beds. These culls were all seedlings that I have grown for a number of years but were just not living up to my expectations. Yes, it's a little tough to throw away something that I've enjoyed over the years but that just comes with hybridizing.
Seedling 14-013
Seedling 14-013 has 5" blooms on 23" scapes. It multiplies fairly well and makes a nice clump. It comes from the cross (Mississippi Memento X Wild Cherry Round Up).
|
| September 27th, 2020 |
Yesterday I fertilized all my daylilies. I used a balanced fertilizer (13-13-13) spreading it in a circle around each clump. Then I watered it in a little. I watered it a little more his morning as I want the fertilizer to leach down to the root zone where it can give the fall growth a good jump start. Last year I fertilized at the beginning of September. Because it was so hot, I only fertilized lightly thinking I would come back again with another light application. Unfortunately I got busy and that never happened so this year I waited until I felt comfortable with a proper fertilization.
It seems that my daylilies look better this fall than they usually do at this time of year. Many of the plants are surprisingly large coming out of our hot summer. Then it occurred to me that I did something this year that I usually don't do. I did a light fertilization in late June after most of the daylilies finished blooming. I've always stayed away from fertilizing in the summer because I believed it would stimulate growth at a time the plant was trying to conserve resources. I decided to experiment this year and it seems to have helped them during the summer.
Seedling 12-017
Seedling 12-017 is not a spectacular daylily but it's a nice daylily and always makes the cut each year. It has 5.5" blooms on 24" scapes. It clumps up nicely and the foliage always looks good. It has had as many as 22 blooms on a scape but it's typically less than 20. It comes from the cross (Hedwig's Eyes X Crazy Ivan).
|
| September 25th, 2020 |
Today I did my first fall spraying for rust. The weather was perfect - dry with mild temperatures and practically no wind. The recent weather has caused a few of the daylilies to show signs of rust but most still have clean foliage. In the past I've held off spraying until more rust shows up but this year I'm going to try and do more to keep it under control (famous last words).
I used the last of my Heritage fungicide today. I went online to purchase more only to discover that nobody seems to have any in stock. The active ingredient in Heritage is Azoxystrobin so I searched for that hoping to find something else. I found a product called Azoxy 2SC Select which had a note that it was a replacement for Heritage. It has the same active ingredient but is in a liquid form (Heritage was water soluble granules). It's a bit pricy but so are the other fungicides that control rust.
Seedling 08-029
Today's image is seedling 08-029. It has 6" blooms on 29" scapes and comes from the cross (Sheer Excitement X Zephyr's Song).
|
| September 23rd, 2020 |
Tropical storm Beta came and went leaving us with 8+ inches of rain over several days. This was wonderful for the garden but with it will probably come the first rust outbreak of the fall season. Temperatures for the past few days stayed in the 70's and the daylily foliage was constantly wet - perfect conditions for rust. I've seen extended periods of rain and mild temperatures trigger a rust outbreak even during the middle of summer. I guess I'll be charging up the sprayer tomorrow.
Seedling 15-006
Seedling 15-006 has 6" blooms on 27" scapes. The bud count is less than I like but it puts out lots of scapes and reblooms very well which compensates for the lower bud count. It comes from the cross (Mississippi Memento X Thomas Tew).
|
| September 19th, 2020 |
The weather today was great with low humidity, moderate temperatures, and a nice breeze - perfect for working in the garden. So I decided to feed the soil. I made a soil drench by mixing the following ingredients with water in a 5-gal bucket.
- 5 TBSP Epsom Salt
- 1 TBSP Sequestrene
- 4 Oz Agricultural Molasses
- 4 Oz Liquid Seaweed
- 1 cup Liquid Humus
- 1 cup Garrett Juice Pro
- 1 squirt Superthrive
Then I applied about 3 cups to each daylily clump.
The Garrett Juice is to supply beneficial soil microbes & Mycorrhizae. The agricultural molasses is to feed the beneficial microbes helping them multiply in the soil. To feed all the daylily clumps took about 50-60 gallons of the mix.
Seedling 13-001
Seedling 13-001 has 6" blooms on 27" scapes. It multiplies reasonably well and makes a nice clump. The bud count is lower than I like but it reblooms nicely putting on a decent show so I've kept it around. It comes from the cross Wild Cherry Round Up X Walter Kennedy).
|
| September 12th, 2020 |
I'm starting to see the signs that the end of summer is approaching. The daytime temperatures are beginning to moderate, there's been an increase in Monarch butterflies visiting the milkweed, humming birds have been spotted around the dwarf firebush, and a couple of daylilies have succumbed to crown rot (unfortunately). I have heard from numerous local daylily enthusiasts that fall is the time of year around here when most daylily crown rot happens and it's true for me too. Usually it's only a few cultivars, primarily the less vigorous growers, and I suppose it's a natures way to eliminate the weaker plants.
Still, it can hurt when a special seedling suddenly turns yellow, keels over, and dies a smelly death. But it's better if it happens in my garden than registering it and having it happen in someone else's. So far I've only lost a couple. One weak grower that was scheduled to be removed this fall and one that I liked and had hopes for. Hopefully fall will be kind to me this year (smile).
Seedling 13-069
Today's image is seedling 13-069. It has 6" blooms on 29" scapes and comes from the cross (Orange City X Caribbean Magic).
|
Previous Posts
Back to current posts
|